


You don't need a degree in chemistry or a thousand dollars in equipment to brew a world-class cup of coffee in your own kitchen. While the world of specialty coffee often feels gatekept by complex ratios and expensive gadgets, the truth is much simpler. It's about respecting the bean and mastering a few basic movements. This beginner's guide to pour over coffee is designed to help you cut through the noise and find a brewing rhythm that actually works for your morning routine.
We know how frustrating it is to follow a complicated online recipe only to end up with a cup that's bitter, sour, or just plain inconsistent. You want the clarity and bright flavors of a cafe-quality pour over without the math-induced headache. This guide provides a straightforward, unpretentious path to better coffee. You'll learn how to choose between brewers like the V60 or Chemex, why water temperature is a dealbreaker, and how to select fresh beans like a bright Ethiopia Limu Organic or a balanced Honduras Morning Splendeur. We'll give you a repeatable process and the confidence to brew a cup you're truly proud of every single morning.
Key Takeaways
- Discover why manual infusion and paper filters create a cleaner, brighter flavor profile by removing heavy oils and sediment.
- Use this beginner's guide to pour over coffee to select the right essential gear, comparing technical brewers like the V60 with more forgiving options.
- Master the "Golden Ratio" of coffee to water using simple measurements that ensure a balanced cup without requiring complex math.
- Learn the non-negotiable steps of the brewing ritual, including how to properly rinse your filter and execute a perfect bloom.
- Identify and fix common mistakes like using water that is too hot or storing your fresh beans in ways that damage their integrity.
Why Pour Over? The Secret to Cleaner, Brighter Coffee
Pour over coffee is a manual infusion brewing method. It is simple. You pour hot water over a bed of coffee grounds held in a filter. The water passes through the coffee and the filter into a carafe or mug. While it sounds basic, this method offers a level of clarity that automatic machines rarely match. It allows you to taste the specific characteristics of the bean rather than just a generic coffee flavor.
The secret lies in the paper filter. This is what we call the Paper Filter Advantage. Most pour over systems use a dense paper that traps heavy coffee oils and micro-fine sediment. This results in a crisp, bright flavor profile. If you compare this to a French press, the difference is immediate. A French press uses a metal mesh that lets oils through, creating a heavy, sometimes muddy body. Pour over highlights the delicate acidity and floral notes of the bean. It is the best way to experience the true character of a single-origin coffee.
This beginner's guide to pour over coffee emphasizes that the ritual is as much about the process as the result. Taking five minutes to focus on your brew creates a grounded start to your morning. It is a moment of craftsmanship in an otherwise busy day.
Similarly, many find that a mindful skincare routine complements their coffee ritual; read more about how House of GRŌ® uses adaptogenic mushrooms and organic botanicals to ground your morning.
The Difference Between Drip and Manual Brewing
Automatic drip machines often struggle with precision. Many home brewers do not reach the proper temperature or they saturate the grounds unevenly. This leads to under-extraction or a bitter, burnt taste. When you brew manually, you control exactly where the water goes. You ensure every grain of coffee is saturated. This manual approach is a key part of the history of drip and pour-over coffee, giving you the power to adjust the flavor to your exact preference. You are the programmer, not the machine.
Why Your Beans Matter More Than Your Brewer
You do not need the most expensive gear to make great coffee, but you do need fresh beans. Most grocery store coffee is roasted months before it hits the shelf. By the time you buy it, the aromatic compounds are gone. We advocate for a roast-to-order model because freshness is the single most important factor in your cup. Always look for a specific roast date on the bag. If a bag only has an "expiration date," put it back. For a deeper look at origin and flavor profiles, check out our guide on Coffee Beans: The Ultimate Beginner's Guide. Freshness ensures that the "bloom" and the aroma of your pour over are actually present.
The Beginner's Pour Over Kit: Essential Gear Without the Fluff
Starting your journey doesn't require a massive investment or a kitchen full of gadgets. You only need three items to begin: a dripper, a filter, and a way to heat water. Many enthusiasts will tell you that you need high-end scales and digital kettles immediately. That isn't true. While precision helps, this beginner's guide to pour over coffee is about starting where you are. You can achieve excellent results with basic tools as long as you understand how they work together to create a clean cup.
The dripper is your most important choice. This is the device that holds your coffee grounds and filter. A plastic Hario V60 02 dripper is a very accessible entry point for those who want to master technique. It is the industry standard for a reason, but it requires a steady hand. If you want something more forgiving, a Kalita Wave 185 has a flat bottom that helps ensure even extraction even if your pour isn't perfect. For those who value aesthetics and a very clean cup, a Chemex uses thicker filters that remove more oils than a standard V60. Each device offers a slightly different ritual, but they all serve the same goal of manual infusion.
Choosing Your First Brewing Device
Material matters for heat retention. Plastic drippers are actually superior for beginners because they don't pull heat away from the brewing water like cold ceramic or glass does. If you use ceramic, you must pre-heat it thoroughly with hot water. Consistency is the goal. When you maintain a stable temperature, you can better follow The Golden Ratio of coffee to water. This ratio is the foundation of a balanced cup, ensuring you don't end up with a brew that is too weak or too intense.
The Silent Hero: A Quality Burr Grinder
If you spend money on one piece of gear, make it a burr grinder. Blade grinders chop coffee into uneven chunks. Some pieces are like dust, while others are like pebbles. The dust over-extracts and tastes bitter, while the pebbles under-extract and taste sour. A burr grinder crushes the beans into uniform particles. This uniformity is the key to avoiding that frustrating, inconsistent taste at home. You can find more specific advice on choosing the right model in The Ultimate Guide to Coffee Grinders.
Finally, consider your water control. A gooseneck kettle is helpful because it allows for a slow, precise stream. If you aren't ready to buy one, use a measuring cup with a small spout. It won't be perfect, but it gets you started. To test your new setup without the guesswork, we recommend starting with The All Day Sampler to see how different origins respond to your brewing style.
The Golden Ratio: Simplifying Coffee Math
Coffee math often scares people away from manual brewing. Many experts insist on digital scales and precise milligram measurements. While that level of detail is great for professionals, this beginner's guide to pour over coffee is about making a great cup accessible to everyone. The goal is to hit the "Golden Zone" of balance using a 1:16 or 1:17 ratio. This simply means for every gram of coffee, you use 16 or 17 grams of water. It is the standard for a reason; it allows the coffee to express its full range of flavors without becoming too intense or too watery.
If you don't own a scale yet, don't worry. You can use a simple volume-based cheat sheet to get started. A general rule of thumb is to use two level tablespoons of ground coffee for every six ounces of water. This isn't as precise as a scale, but it gets you close enough to enjoy a high-quality brew. Your grind size should resemble coarse Kosher salt. If the grounds look like fine flour, the water will struggle to pass through. If they look like large sea shells, the water will rush through too fast. Visual cues are your best friend when you are learning the craft.
Water temperature is just as vital as the ratio. You don't need a thermometer to get this right. Bring your water to a boil, then let it sit for about 30 to 60 seconds. This naturally brings the temperature down to roughly 200°F. This is the sweet spot for extracting flavor without scorching the delicate compounds in the beans. For more technical details on equipment and process, the National Coffee Association's guide to pour-over offers a solid foundation for those looking to expand their setup.
Understanding Extraction: Sour vs. Bitter
Extraction is the process of water pulling flavor out of the coffee. If your coffee tastes sour, salty, or thin, it is under-extracted. This happens if the water moves through the grounds too quickly or if the grind is too coarse. If it tastes bitter, dry, or ashy, it is over-extracted. This occurs when the water sits too long or the grind is too fine. When you hit the sweet spot, you'll taste the specific, vibrant notes of your beans, such as the bold, dark berry flavors in our Kenya AA Supreme. Balance is the ultimate goal of every pour.
Water Quality: The Forgotten Ingredient
Never use straight tap water if you can avoid it. Chlorine and heavy minerals in city water can mask the delicate notes of a specialty roast. A basic charcoal filter pitcher is a simple, affordable fix that makes a massive difference in your morning cup. Coffee is 98% water, so the quality of your water dictates the absolute ceiling of how good your brew can taste. If the water tastes bad on its own, it will taste bad in your coffee.
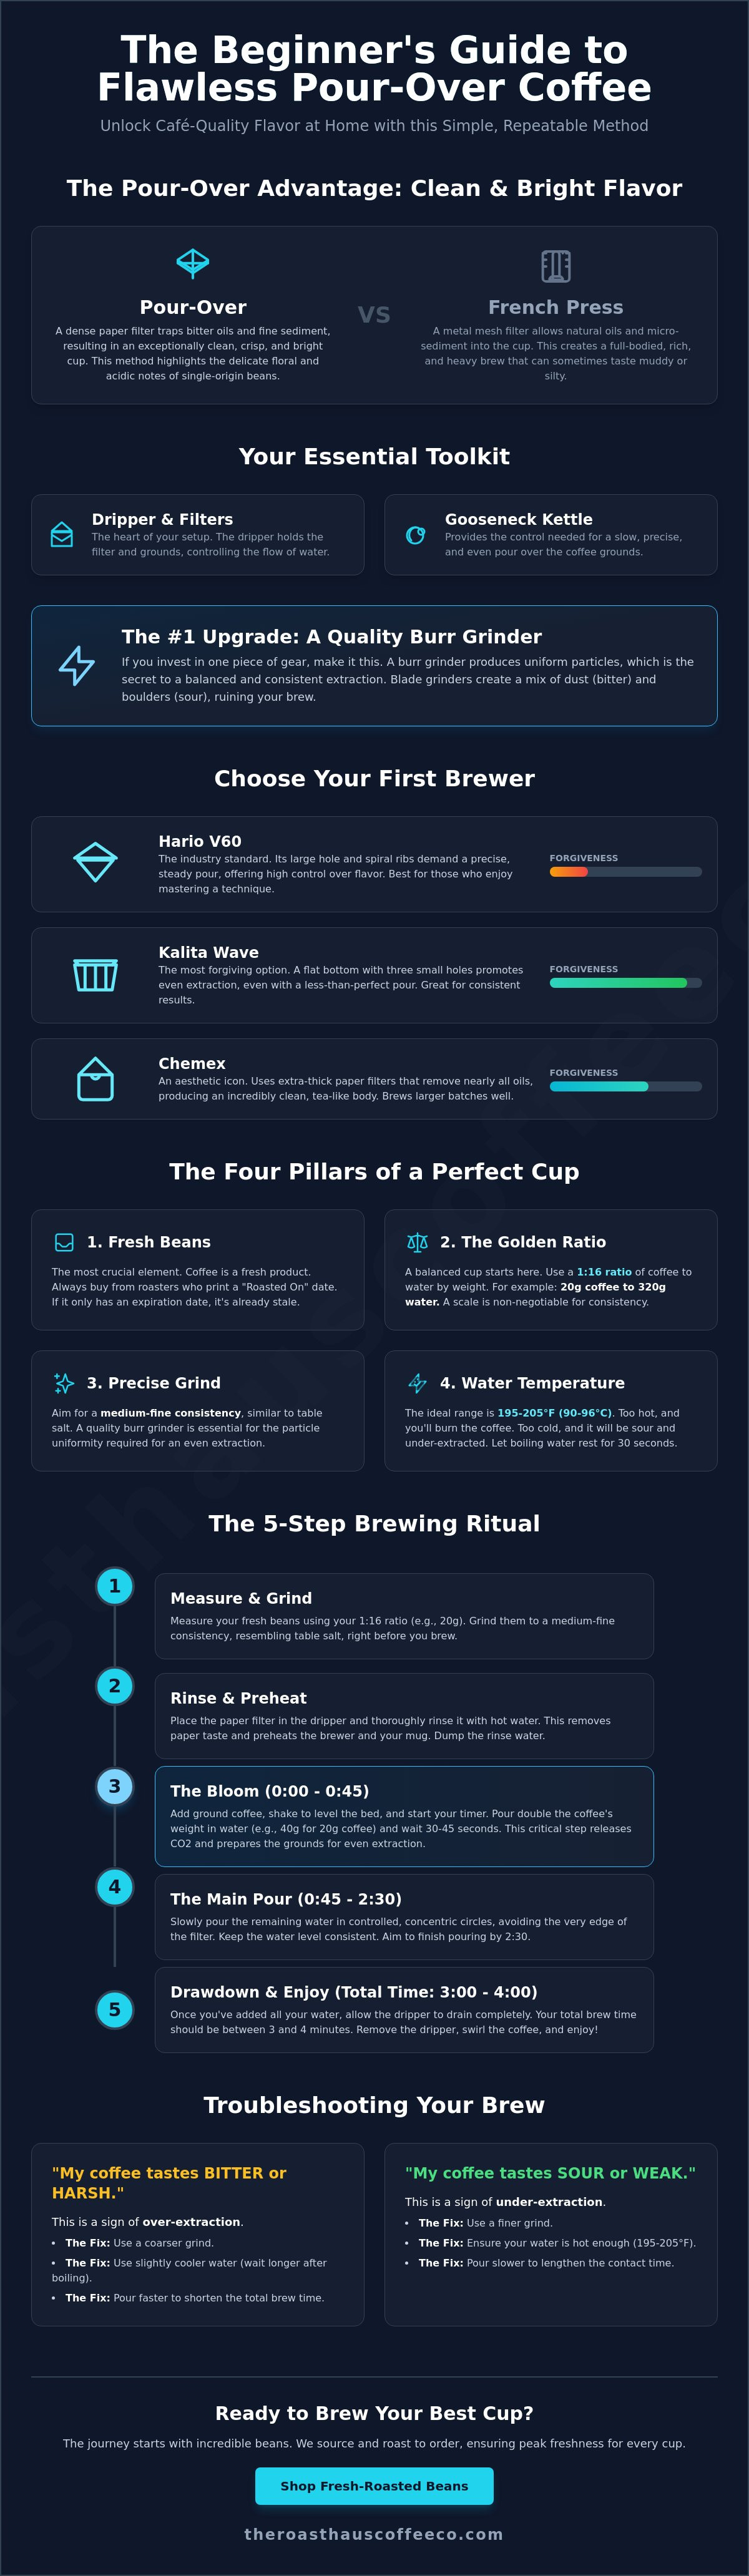
How to Brew: A Step-by-Step Pour Over Recipe
Consistency is the hallmark of a great craftsman. This beginner's guide to pour over coffee provides a simple, repeatable workflow that you can memorize quickly. You don't need a stopwatch for every single second, but you do need to respect the timing of the water and the beans. Follow these five steps to transform your morning routine into a rewarding ritual.
- Step 1: Prep and Rinse. Place your filter in the dripper and pour hot water over it. This warms the brewer and removes the papery taste that can interfere with the coffee's natural sweetness. Remember to discard the rinse water from your mug before adding grounds.
- Step 2: The Bloom. Add your coffee grounds. Pour just enough water to saturate them completely. Wait 30 seconds. You will see bubbles forming; this is the coffee "gassing off" and preparing to release its full flavor.
- Step 3: The Main Pour. Start in the center of the grounds. Pour in slow, concentric circles moving toward the edge, then back to the center. Keep your pour steady and gentle to keep the grounds saturated.
- Step 4: The Draw Down. Allow the water to filter through naturally. You are looking for a flat, even bed of grounds at the bottom once the water has passed. A high wall of grounds on the side of the filter means your pour was too aggressive.
- Step 5: Swirl and Enjoy. Once the dripping stops, remove the dripper. Give your coffee a quick swirl in the mug or carafe. This aerates the liquid and ensures the flavor is consistent from the first sip to the last.
Mastering the Bloom Phase
The bloom is non-negotiable. When coffee is fresh, it contains carbon dioxide. If you don't let this gas escape, it creates a barrier that prevents water from extracting flavor. This leads to a sour, thin cup. Use roughly double the weight of the coffee in water for this phase. If you see active bubbling, it is a sign of high-quality, fresh roasting. To practice these steps with a variety of flavor profiles, try The All Day Sampler.
Refining Your Pouring Technique
Avoid pouring water directly onto the paper filter edges. This causes bypass, where water flows straight into your mug without touching the coffee. Keep your stream focused on the dark grounds. For beginners, the Pulse Pour method is often easiest. Instead of one long pour, add water in three or four smaller stages. This helps you maintain a consistent water level and prevents the brewer from overflowing. It gives you more control over the pressure and the final taste.
Troubleshooting and Leveling Up Your Brew
Even with the best intentions, your first few attempts might not be perfect. That is part of the process. This beginner's guide to pour over coffee is meant to be a living document for your kitchen. You learn by tasting and adjusting. One common mistake is using water that is rolling off a full boil. If the water is too hot, it scorches the delicate grounds and produces a burnt, ashy flavor. Always let your kettle sit for a minute before you pour to ensure you stay in that ideal 200°F range.
Another frequent error involves storage. Never store your coffee beans in the freezer. Many people think this preserves freshness, but it actually introduces moisture through condensation every time you open the bag. This moisture damages the cellular structure of the bean and kills the vibrant flavor profile you are trying to extract. Keep your beans in a cool, dark, airtight container on the counter instead. Your beans are alive with flavor; treat them with respect.
Your results from yesterday should dictate your actions today. If your coffee took four minutes to draw down and tasted bitter, your grind was likely too fine. Coarsen it up. If the water rushed through in two minutes and the cup felt thin or sour, you need a finer grind. Small, incremental changes are the secret to mastering this craft without getting overwhelmed by complex science. You don't need a lab; you just need a palate.
Diagnosing a Bad Cup
If your brew tastes weak or tea-like, you likely under-extracted. You can fix this by using more coffee grounds or a finer grind next time. If the cup is harsh, dry, or leaves an unpleasant coating on your tongue, you over-extracted. Try a coarser grind or slightly cooler water. We recommend keeping a simple coffee journal for your first week. Write down the bean, the grind setting, and how it tasted. You will find your personal preference much faster when you track the variables.
The Path to Consistency: Subscriptions and Freshness
Consistency is impossible if you are constantly switching between old grocery store bags. A steady supply of fresh beans allows you to actually calibrate your technique. When you know the beans are high quality, you can focus on your pour. Many of our customers find success with a Roasted-to-Order Subscription. This ensures you always have small-batch beans at their peak flavor window without having to remember to reorder.
Ready to put these skills to the test? Start your journey with an All Day Sampler to find your favorite origin. Whether it is the bright citrus of an Ethiopia Limu Organic or the chocolatey depth of a Honduras Morning Splendeur, the right bean makes the ritual worth it.
Master Your Morning Ritual
Brewing manual coffee is a skill that grows with every pour. You now understand that the right gear doesn't have to be expensive and that simple ratios can replace complex math. By mastering the bloom and respecting your water temperature, you've already moved past the frustrations that stop most people. This beginner's guide to pour over coffee provides the framework, but the final ingredient is the integrity of the bean itself.
At our family-owned artisan roastery in Wyandotte, OK, we believe in the value of craftsmanship. We ship our beans within 24 hours of roasting so that direct-to-consumer freshness is guaranteed at your doorstep. You've put in the work to learn the technique; now give yourself the best possible materials. Shop our Small-Batch, Roasted-to-Order Coffee Beans to start your next brew. We are proud to be a part of your coffee journey. Keep practicing, stay curious, and enjoy every sip of the results.
Frequently Asked Questions
Is pour over coffee better than drip coffee?
Pour over coffee provides a cleaner and more vibrant cup compared to standard drip machines because you control every variable. The manual process allows for even saturation and precise temperature management. Automatic machines often miss these details. This method highlights the delicate flavor notes of specialty beans rather than producing a generic, muddy taste. It is the preferred choice for those who value clarity.
What is the best coffee-to-water ratio for a beginner?
A 1:17 ratio is the most forgiving starting point for a beginner's guide to pour over coffee. This means using one gram of coffee for every 17 grams of water. If you don't have a scale, start with two level tablespoons for every six ounces of water. This balance ensures your brew isn't too overpowering or too thin while you are still learning the technique.
Do I really need a gooseneck kettle for pour over?
You don't strictly need a gooseneck kettle to start, but it significantly improves your precision. A standard kettle or a measuring cup with a spout can work in the beginning. The narrow spout of a gooseneck allows for the slow, controlled stream required to saturate the grounds evenly. It prevents you from splashing the filter walls and causing water to bypass the coffee.
Why does my pour over coffee taste bitter?
Bitterness is usually a sign of over-extraction caused by a grind that's too fine or water that's too hot. If the water stays in contact with the grounds for too long, it pulls out harsh, ashy flavors. Try coarsening your grind slightly. You can also let your boiling water sit for 60 seconds before you begin your pour to lower the temperature to a safer range.
How long should it take to brew a pour over?
A standard brew usually takes three to four minutes. This beginner's guide to pour over coffee suggests timing from the first pour to the final draw down. If it finishes in under two minutes, coarsen your grind. If it takes longer than five minutes, your grind is too fine. Aim for a steady flow that looks like a thin, continuous stream of liquid.
Can I use pre-ground coffee for a pour over?
You can use pre-ground coffee, but you will lose the vibrant aromatics that make pour over special. Coffee begins to oxidize and lose flavor within minutes of being ground. For the best experience, we recommend grinding fresh beans immediately before you brew. This ensures you capture the full sensory profile of the roast rather than a stale version of the original flavors.
What is the best grind size for a Hario V60?
The ideal grind size for a Hario V60 is medium-fine, similar in texture to Kosher salt. Because the V60 has a large drainage hole and internal ridges, the water flows through quickly. A slightly finer grind creates the necessary resistance to extract the coffee properly. It prevents the water from rushing straight through the grounds and leaving you with a weak, under-extracted cup.
How do I keep my pour over coffee hot?
Keeping your coffee hot starts with pre-heating your brewer and your mug with hot water before you add the grounds. This step prevents the equipment from stealing heat from the coffee during the brewing process. Using a plastic dripper also helps. Plastic retains heat better than ceramic or glass models, which often act as heat sinks and cool your water down too quickly.

